CentOS 7にWebインターフェースでサーバ管理ができるWebminをインストールしてみました。
Webmin
http://www.webmin.com/
参考サイト
Install Webmin on CentOS 7 / RHEL 7
https://www.itzgeek.com/how-tos/linux/centos-how-tos/install-webmin-on-centos-7-rhel-7.html
- Repositoryファイルの作成
- Webminをインストール
- Firewallの設定
- 起動スクリプト
- 設定ファイル
mirrorlistを指定していますが確認したら”http://download.webmin.com/download/yum/”のみでした。
どこにもミラーされていないようです。
|
1 2 3 4 5 6 7 8 9 |
# vi /etc/yum.repos.d/webmin.repo # cat /etc/yum.repos.d/webmin.repo [webmin] name=Webmin Repository #baseurl=http://download.webmin.com/download/yum/ mirrorlist=http://download.webmin.com/download/yum/mirrorlist gpgcheck=1 enabled=1 gpgkey=http://www.webmin.com/jcameron-key.asc |
|
1 2 3 4 5 6 7 8 9 10 11 12 13 14 15 16 17 18 19 20 21 22 23 24 25 26 |
# yum info webmin Available Packages Name : webmin Arch : noarch Version : 1.870 Release : 1 Size : 28 M Repo : webmin Summary : A web-based administration interface for Unix systems. License : Freeware Description : A web-based administration interface for Unix systems. Using Webmin you can : configure DNS, Samba, NFS, local/remote filesystems and more using your : web browser. : : After installation, enter the URL http://localhost:10000/ into your : browser and login as root with your root password. # yum -y install webmin (snip) Installed: webmin.noarch 0:1.870-1 Dependency Installed: perl-Encode-Detect.x86_64 0:1.01-13.el7 perl-Net-SSLeay.x86_64 0:1.55-6.el7 Complete! |
ポートはデフォルトで10000です。
|
1 2 3 4 |
# firewall-cmd --permanent --add-port=10000/tcp success # firewall-cmd --reload success |
起動スクリプトは/etc/init.d/webminです。
インストール時に自動起動の設定が行われていました。
|
1 2 3 4 5 6 7 8 9 10 11 |
# chkconfig --list webmin Note: This output shows SysV services only and does not include native systemd services. SysV configuration data might be overridden by native systemd configuration. If you want to list systemd services use 'systemctl list-unit-files'. To see services enabled on particular target use 'systemctl list-dependencies [target]'. webmin 0:off 1:off 2:on 3:on 4:off 5:on 6:off |
デフォルトです。
|
1 2 3 4 5 6 7 8 9 10 11 12 13 14 15 16 17 18 19 20 21 22 23 24 25 26 27 28 29 30 31 32 33 34 35 36 37 38 39 40 41 42 43 44 45 46 |
# cat /etc/webmin/miniserv.conf port=10000 root=/usr/libexec/webmin mimetypes=/usr/libexec/webmin/mime.types addtype_cgi=internal/cgi realm=Webmin Server logfile=/var/webmin/miniserv.log errorlog=/var/webmin/miniserv.error pidfile=/var/webmin/miniserv.pid logtime=168 ppath= ssl=1 no_ssl2=1 no_ssl3=1 no_tls1=1 no_tls1_1=1 ssl_honorcipherorder=1 no_sslcompression=1 env_WEBMIN_CONFIG=/etc/webmin env_WEBMIN_VAR=/var/webmin atboot=1 logout=/etc/webmin/logout-flag listen=10000 denyfile=\.pl$ log=1 blockhost_failures=5 blockhost_time=60 syslog=1 ipv6=1 session=1 premodules=WebminCore server=MiniServ/1.870 userfile=/etc/webmin/miniserv.users keyfile=/etc/webmin/miniserv.pem passwd_file=/etc/shadow passwd_uindex=0 passwd_pindex=1 passwd_cindex=2 passwd_mindex=4 passwd_mode=0 preroot=authentic-theme passdelay=1 login_script=/etc/webmin/login.pl logout_script=/etc/webmin/logout.pl cipher_list_def=1 failed_script=/etc/webmin/failed.pl |
この状態だとすべて接続許可のようです。
http://www.webmin.com/faq.html
・How can I change Webmin’s list of allowed IP addresses from the shell?
The file you need to modify is /etc/webmin/miniserv.conf , in particular the allow= or deny= lines. If the allow= line exists, it contains a list of all addresses and networks that are allowed to connect to Webmin. Similarly, the deny= line contains addresses that are not allowed to connect. After modifying this file, you need to run /etc/webmin/stop ; /etc/webmin/start for the changes to take effect. Naturally, the file can only be edited by the root user.
最後に許可するIPリスト(今回はallow=127.0.0.1 192.168.1.0/24)を追記してサービスを再起動します。
allow=を追記するとそのIP以外からは拒否になりました。
|
1 2 3 4 5 6 7 |
# vi /etc/webmin/miniserv.conf allow=127.0.0.1 192.168.1.0/24 # /etc/init.d/webmin restart Stopping Webmin server in /usr/libexec/webmin Starting Webmin server in /usr/libexec/webmin Pre-loaded WebminCore |
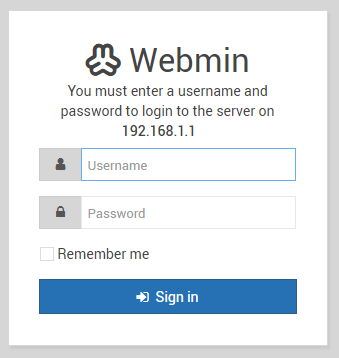
https://webmin_server_ip:10000にアクセスするとログイン画面が表示されます。
取り敢えずrootでログインしてみました。
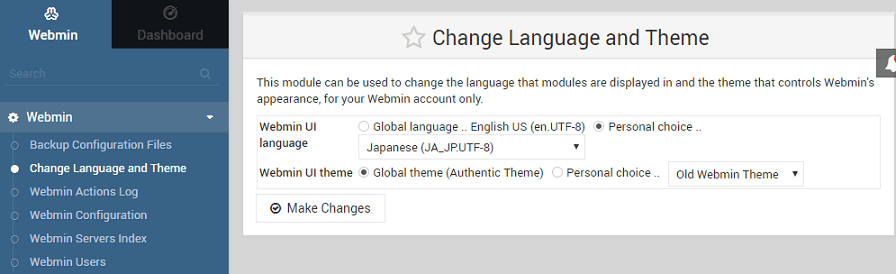
表示を日本語にするにはメニューから[Webmin]-[Change Language and Theme]を選択してJapaneseを選択します。
ちなみにInternet Explorer 11では変更できなかったのでChromeで行いました。