勉強も兼ねてZabbix applianceを導入してモニターしています。
導入当時はZabbix appliance 3.0 TLSでしたが現在はZabbix 4.0.4までアップデートしました。
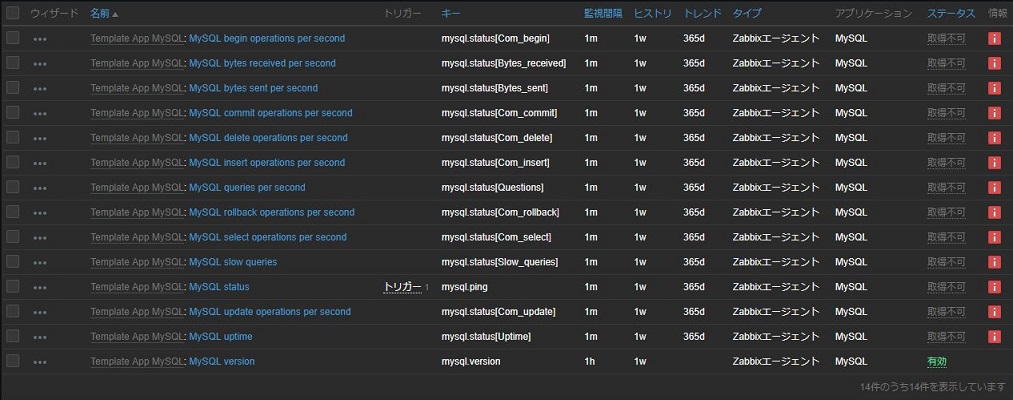
さて導入当初から標準で用意されているMySQL監視テンプレートを組み込んでいたのですが、値の取得不可のまま放置していました。
ずっと気になっていたので真面目に設定してみました。
- Zabbix Agent用のDBアクセスユーザの作成
- userparameter_mysql.confの編集
- .my.cnfの作成
- Zabbix Agentの再起動
- ステータスの取得確認
Zabbix Agentが監視対象となるMariaDBの情報を取得するためにDBユーザを作成します。
|
1 2 3 4 5 6 7 8 9 10 11 12 13 14 15 16 17 18 19 |
# mysql -u root -p Enter password: Welcome to the MariaDB monitor. Commands end with ; or \g. Your MariaDB connection id is 467016 Server version: 10.1.38-MariaDB MariaDB Server Copyright (c) 2000, 2018, Oracle, MariaDB Corporation Ab and others. Type 'help;' or '\h' for help. Type '\c' to clear the current input statement. MariaDB [(none)]> grant process on *.* to zabbixagent@localhost identified by 'Password'; Query OK, 0 rows affected (0.22 sec) MariaDB [(none)]> MariaDB [(none)]> flush privileges; Query OK, 0 rows affected (0.10 sec) MariaDB [(none)]> quit; Bye |
/etc/zabbix/zabbix_agentd.d/userparameter_mysql.confを編集します。
このファイルはDBステータスの取得項目と取得するためのDBアクセスユーザとパスワードが記述されたファイル.my.cnfの場所をHOMEで指定するものです。
標準ではHOME=/var/lib/zabbixと指定されているので/var/lib/zabbix/.my.cnfからDBアクセスユーザ情報を取得することになります。
/var/lib/zabbix/が無かったので/etc/zabix/.my.cnfを読み込むように設定変更(HOME=/etc/zabbix)をしました。
|
1 2 3 4 5 6 7 8 9 10 11 12 13 14 15 16 17 18 19 20 |
:~# vi /etc/zabbix/zabbix_agentd.d/userparameter_mysql.conf :~# cat /etc/zabbix/zabbix_agentd.d/userparameter_mysql.conf # For all the following commands HOME should be set to the directory that has .my.cnf file with password information. # Flexible parameter to grab global variables. On the frontend side, use keys like mysql.status[Com_insert]. # Key syntax is mysql.status[variable]. UserParameter=mysql.status[*],echo "show global status where Variable_name='$1';" | HOME=/etc/zabbix mysql -N | awk '{print $$2}' # Flexible parameter to determine database or table size. On the frontend side, use keys like mysql.size[zabbix,history,data]. # Key syntax is mysql.size[<database>,<table>,<type>]. # Database may be a database name or "all". Default is "all". # Table may be a table name or "all". Default is "all". # Type may be "data", "index", "free" or "both". Both is a sum of data and index. Default is "both". # Database is mandatory if a table is specified. Type may be specified always. # Returns value in bytes. # 'sum' on data_length or index_length alone needed when we are getting this information for whole database instead of a single table UserParameter=mysql.size[*],bash -c 'echo "select sum($(case "$3" in both|"") echo "data_length+index_length";; data|index) echo "$3_length";; free) echo "data_free";; esac)) from information_schema.tables$([[ "$1" = "all" || ! "$1" ]] || echo " where table_schema=\"$1\"")$([[ "$2" = "all" || ! "$2" ]] || echo "and table_name=\"$2\"");" | HOME=/etc/zabbix mysql -N' UserParameter=mysql.ping,HOME=/etc/zabbix mysqladmin ping | grep -c alive UserParameter=mysql.version,mysql -V |
/etc/zabix/.my.cnfを作成します。
|
1 2 3 4 5 6 7 8 9 10 11 12 13 |
# vi /etc/zabbix/.my.cnf # cat /etc/zabbix/.my.cnf [mysql] user=zabbixagent password=Password [mysqladmin] user=zabbixagent password=Password # chown zabbix:zabbix /etc/zabbix/.my.cnf # chmod 600 /etc/zabbix/.my.cnf # ls -la /etc/zabbix/.my.cnf -rw------- 1 zabbix zabbix 101 Feb 25 21:51 /etc/zabbix/.my.cnf |
|
1 |
# systemctl restart zabbix-agent |
Zabbix Server側で値が取得できるか確認してみます。
それらしい値が表示されているので大丈夫そうです。
|
1 2 3 4 5 6 |
$ zabbix_get -s 192.168.1.2 -k mysql.uptime 1426598 $ zabbix_get -s 192.168.1.2 -k mysql.ping 1 $ zabbix_get -s 192.168.1.2 -k mysql.status[Bytes_sent] 879744126152 |
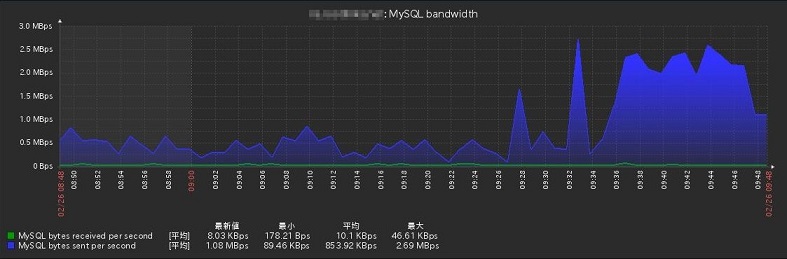
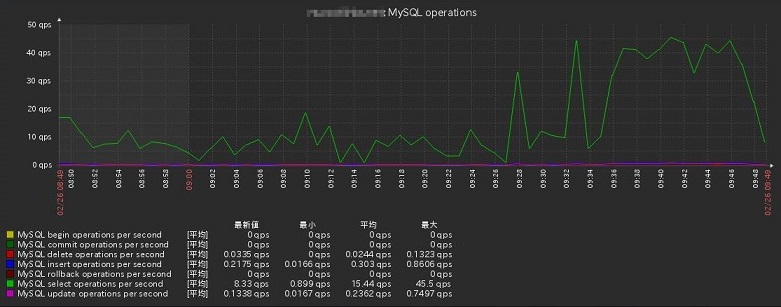
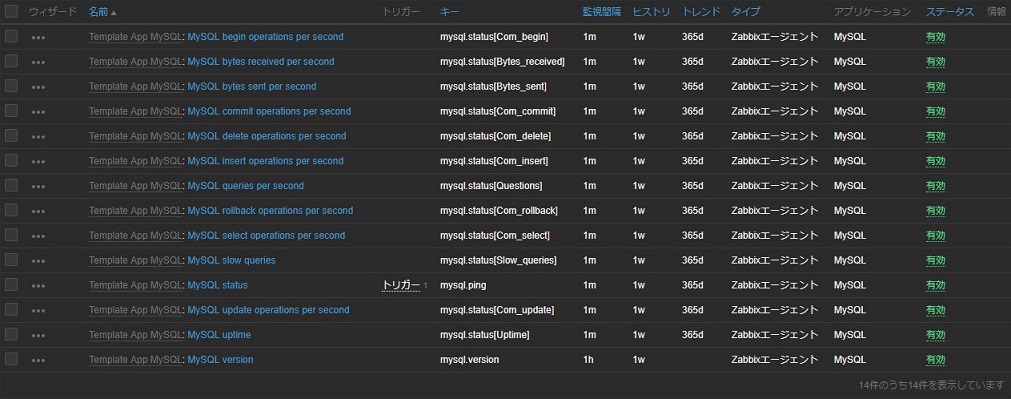
暫くするとステータスがすべて有効になりました。
標準で用意されているグラフも表示されるようになりました。